[발번역] QML Canvas Element
Qt 2017. 2. 22. 09:237. Canvas Element
Section author: jryannel
Note
Last Build: March 08, 2015 at 20:55 CET
The source code for this chapter can be found in the assets folder.
QtQuick에 타원이 필요한지에 대한 논의가 있었던 Qt4에 QML이 도입 된 초기에. 타원의 문제는 다른 사람들도 지원이 필요하다고 주장 할 수 있다는 것입니다. Qt Quick에는 직사각형 형태의 타원이 없습니다. Qt4에서 필요하다면 이미지를 사용하거나 자신 만의 C ++ 타원 요소를 작성해야합니다.
스크립팅 된 도면을 허용하기 위해 Qt5는 캔버스 요소를 도입했습니다. 캔버스 요소는 그래픽, 게임 또는 자바 스크립트를 사용하여 다른 시각적 이미지를 즉시 칠하는 데 사용할 수있는 해상도 종속 비트 맵 캔버스를 제공합니다. canvas 요소는 HTML5 canvas 요소를 기반으로합니다.
캔버스 요소의 기본 개념은 컨텍스트 2D 객체를 사용하여 패스를 렌더링하는 것입니다. 컨텍스트 2D 객체에는 필요한 그래픽 함수가 포함되어 있지만 캔버스는 드로잉 캔버스로 사용됩니다. 2D 컨텍스트는 스트로크, 채우기, 그라디언트, 텍스트 및 다른 경로 생성 명령 세트를 지원합니다.
간단한 경로 그림의 예를 봅시다.
import QtQuick 2.0

Canvas {
    id: root
    // canvas size
    width: 200; height: 200
    // handler to override for drawing
    onPaint: {
        // get context to draw with
        var ctx = getContext("2d")
        // setup the stroke
        ctx.lineWidth = 4
        ctx.strokeStyle = "blue"
        // setup the fill
        ctx.fillStyle = "steelblue"
        // begin a new path to draw
        ctx.beginPath()
        // top-left start point
        ctx.moveTo(50,50)
        // upper line
        ctx.lineTo(150,50)
        // right line
        ctx.lineTo(150,150)
        // bottom line
        ctx.lineTo(50,150)
        // left line through path closing
        ctx.closePath()
        // fill using fill style
        ctx.fill()
        // stroke using line width and stroke style
        ctx.stroke()
    }
}
이렇게하면 50,50의 주연 점과 100의 크기 및 경계 장식으로 사용되는 획이 채워진 사각형이 생성됩니다.

The stroke width is set to 4 and uses a blue color define by strokeStyle. The final shape is setup to be filled through the fillStyle to a “steelblue” color. Only by calling stroke or fill the actual path will be drawn and they can be used independently from each other. A call to stroke or fill will draw the current path. It’s not possible to store a path for later reuse only a drawing state can be stored and restored.
In QML the Canvas element acts as a container for the drawing. The 2D context object provides the actual drawing operation. The actual drawing needs to be done inside the onPaint event handler.
획 너비는 4로 설정되고 strokeStyle에 의해 정의 된 파란색을 사용합니다. 최종 모양은 fillStyle을 통해 "“steelblue"색으로 채워지도록 설정됩니다. stroke 또는 fill 만 호출하면 실제 경로가 그려지며 서로 독립적으로 사용할 수 있습니다. stroke 또는 fill 를 호출하면 현재 경로가 그려집니다. 나중에 다시 사용할 수 있도록 경로를 저장할 수 없으며 그리기 상태 만 저장하고 복원 할 수 있습니다.
QML에서 Canvas 요소는 드로잉의 컨테이너 역할을합니다. 2D 컨텍스트 개체는 실제 그리기 작업을 제공합니다. 실제 그리기는 onPaint 이벤트 핸들러 내에서 수행되어야합니다.
Canvas {
    width: 200; height: 200
    onPaint: {
        var ctx = getContext("2d")
        // setup your path
        // fill or/and stroke
    }
}
캔버스 자체는 일반적인 2 차원 데카르트 좌표계를 제공하며, 왼쪽 위는 (0,0) 점입니다. 높은 y 값은 내려 가고 hight x 값은 오른쪽으로갑니다.
이 경로 기반 API의 일반적인 명령 순서는 다음과 같습니다.
- Setup stroke and/or fill
- Create path
- Stroke and/or fill
    onPaint: {
        var ctx = getContext("2d")

        // setup the stroke
        ctx.strokeStyle = "red"

        // create a path
        ctx.beginPath()
        ctx.moveTo(50,50)
        ctx.lineTo(150,50)

        // stroke path
        ctx.stroke()
    }
이것은 점 P1 (50,50)에서 점 P2 (150,50)까지 수평 한 선을 만듭니다.

Note
일반적으로 경로를 재설정 할 때 항상 시작점을 설정하므로 beginPath 이후의 첫 번째 작업은 종종 moveTo입니다..
7.1. Convenient API
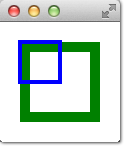
직사각형에 대한 작업의 경우 직접 그리는 획 또는 칠 호출이 필요한 편의 API가 제공됩니다.
// convenient.qml

import QtQuick 2.0

Canvas {
    id: root
    width: 120; height: 120
    onPaint: {
        var ctx = getContext("2d")
        ctx.fillStyle = 'green'
        ctx.strokeStyle = "blue"
        ctx.lineWidth = 4

        // draw a filles rectangle
        ctx.fillRect(20, 20, 80, 80)
        // cut our an inner rectangle
        ctx.clearRect(30,30, 60, 60)
        // stroke a border from top-left to
        // inner center of the larger rectangle
        ctx.strokeRect(20,20, 40, 40)
    }
}
Note
스트로크 영역은 패스의 양쪽에서 선 너비의 절반을 확장합니다. 4 px lineWidth는 경로 외부에 2 px를 그리고 내부에는 2 px를 그립니다.
7.2. Gradients
캔버스는 도형을 색상으로 채울 수 있지만 그래디언트 또는 이미지로도 채울 수 있습니다.
    onPaint: {
        var ctx = getContext("2d")

        var gradient = ctx.createLinearGradient(100,0,100,200)
        gradient.addColorStop(0, "blue")
        gradient.addColorStop(0.5, "lightsteelblue")
        ctx.fillStyle = gradient
        ctx.fillRect(50,50,100,100)
    }
이 예제의 그래디언트는 시작 지점 (100,0)에서 끝점 (100,200)까지 정의되며 캔버스 중간에 수직선을 제공합니다. 그라디언트 정지는 0.0 (그라디언트 시작점)에서 1.0 (그라디언트 끝점)까지의 색상으로 정의 할 수 있습니다. 여기서 우리는 0.0 (100,0)에서 "파란색"색상을 사용하고 0.5 (100,200) 위치에서 "lightsteelblue"색상을 사용합니다. 그라디언트는 그려야 할 직사각형보다 훨씬 더 크게 정의됩니다. 따라서 직사각형은 정의 된 기하학에 대한 그라데이션을 클립합니다.

Note
그라디언트는 채울 경로를 기준으로 좌표가 아닌 캔버스 좌표로 정의됩니다. 우리가 지금까지 QML에서 익숙했던 것처럼, 캔버스에는 상대 좌표 개념이 없습니다.
7.3. Shadows
Note
We had difficulties with shadows in the Qt5 alpha release.
경로는 2D 컨텍스트 개체가있는 그림자를 사용하여 시각적으로 향상시킬 수 있습니다. 그림자는 오프셋, 색상 및 지정된 흐림 효과가있는 경로 주변의 영역입니다. 이를 위해 shadowColor, shadowOffsetX, shadowOffsetY 및 shadowBlur를 지정할 수 있습니다. 이 모든 것은 2D 컨텍스트를 사용하여 정의해야합니다. 2D 컨텍스트는 드로잉 작업에 대한 유일한 API입니다.
그림자를 사용하여 경로 주변의 광선 효과를 만들 수도 있습니다. 다음 예제에서는 "지구"라는 텍스트를 작성하고 주위에 흰색 광선이 있습니다. 이 모든 것을 어두운 배경에서 볼 수있게합니다.
먼저 어두운 배경을 그립니다.
        // setup a dark background
        ctx.strokeStyle = "#333"
        ctx.fillRect(0,0,canvas.width,canvas.height);
다음 경로 구성에 사용될 그림자 구성을 정의합니다.
        ctx.shadowColor = "blue";
        ctx.shadowOffsetX = 2;
        ctx.shadowOffsetY = 2;
        // next line crashes
        // ctx.shadowBlur = 10;
마지막으로 Ubuntu 글꼴 패밀리의 대담한 80px 글꼴을 사용하여 "지구"텍스트를 그립니다.
        ctx.font = 'Bold 80px Ubuntu';
        ctx.fillStyle = "#33a9ff";
        ctx.fillText("Earth",30,180);
Todo
show screen-shot from example, when shadows will work on Qt5
7.4. Images
QML 캔버스는 여러 소스에서 이미지 그리기를 지원합니다. 캔버스 내부의 이미지를 사용하려면 이미지를 먼저로드해야합니다. 이 예제에서는 Component.onCompleted 처리기를 사용하여 이미지를로드합니다.
    onPaint: {
        var ctx = getContext("2d")


        // draw an image
        ctx.drawImage('assets/ball.png', 10, 10)

        // store current context setup
        ctx.save()
        ctx.strokeStyle = 'red'
        // create a triangle as clip region
        ctx.beginPath()
        ctx.moveTo(10,10)
        ctx.lineTo(55,10)
        ctx.lineTo(35,55)
        ctx.closePath()
        // translate coordinate system
        ctx.translate(100,0)
        ctx.clip()  // create clip from triangle path
        // draw image with clip applied
        ctx.drawImage('assets/ball.png', 10, 10)
        // draw stroke around path
        ctx.stroke()
        // restore previous setup
        ctx.restore()

    }

    Component.onCompleted: {
        loadImage("assets/ball.png")
    }
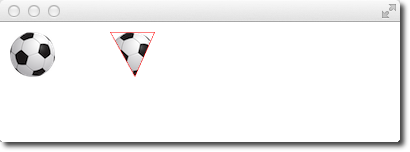
왼쪽은 10x10의 왼쪽 상단에 그려진 공 이미지를 보여줍니다. 오른쪽 이미지는 클립 경로가 적용된 볼을 표시합니다. 이미지 및 다른 경로는 다른 경로를 사용하여 잘릴 수 있습니다. 클리핑은 경로를 정의하고 clip () 함수를 호출하여 적용됩니다. 이후의 모든 그리기 작업은이 경로로 잘립니다. 이전 상태를 복원하거나 클립 영역을 전체 캔버스로 설정하여 클리핑을 다시 비활성화 할 수 있습니다.
7.5. Transformation
캔버스를 사용하면 여러 가지 방법으로 좌표계를 변형 할 수 있습니다. 이는 QML 항목이 제공하는 변환과 매우 유사합니다. 좌표계를 크기 조정, 회전 및 변환 할 수 있습니다. QML과의 차이점에서 변환 원점은 항상 캔버스 원점입니다. 예를 들어 중심 주위의 경로를 축척하려면 캔바스 원점을 패스의 중심으로 변환해야합니다. 변환 메소드를 사용하여보다 복잡한 변환을 적용 할 수도 있습니다.
// transform.qml

import QtQuick 2.0

Canvas {
    id: root
    width: 240; height: 120
    onPaint: {
        var ctx = getContext("2d")
        ctx.strokeStyle = "blue"
        ctx.lineWidth = 4

        ctx.beginPath()
        ctx.rect(-20, -20, 40, 40)
        ctx.translate(120,60)
        ctx.stroke()

        // draw path now rotated
        ctx.strokeStyle = "green"
        ctx.rotate(Math.PI/4)
        ctx.stroke()
    }
}

캔버스를 변환하는 것 외에도 x 및 y 축을 중심으로 축 (x, y)을 사용하여 회전하고 각도를 반경 (360도 = 2 * Math.PI)으로 지정하여 회전 (각도)을 사용하여 회전하고 setTransform (m11, m12, m21, m22, dx, dy)을 사용한 행렬 변환.
Warning
변환은 HTML5 캔버스와 다르게 동작하는 것 같습니다. 이것이 버그인지 확실하지 않습니다.
Note
변환을 재설정하려면 resetTransform() 함수를 호출하여 변환 행렬을 항등 행렬로 다시 설정할 수 있습니다.
ctx.resetTransform()
7.6. Composition Modes
컴포지션을 사용하면 모양을 그리거나 기존 픽셀과 혼합 할 수 있습니다. 캔버스는 globalCompositeOperation (mode) 연산을 사용하여 여러 컴포지션 모드를 지원합니다.
- “source-over”
- “source-in”
- “source-out”
- “source-atop”
    onPaint: {
        var ctx = getContext("2d")
        ctx.globalCompositeOperation = "xor"
        ctx.fillStyle = "#33a9ff"

        for(var i=0; i<40; i++) {
            ctx.beginPath()
            ctx.arc(Math.random()*400, Math.random()*200, 20, 0, 2*Math.PI)
            ctx.closePath()
            ctx.fill()
        }
    }
이 작은 예제는 복합 모드 목록을 반복하고 원으로 사각형을 생성합니다.
    property var operation : [
        'source-over', 'source-in', 'source-over',
        'source-atop', 'destination-over', 'destination-in',
        'destination-out', 'destination-atop', 'lighter',
        'copy', 'xor', 'qt-clear', 'qt-destination',
        'qt-multiply', 'qt-screen', 'qt-overlay', 'qt-darken',
        'qt-lighten', 'qt-color-dodge', 'qt-color-burn',
        'qt-hard-light', 'qt-soft-light', 'qt-difference',
        'qt-exclusion'
        ]

    onPaint: {
        var ctx = getContext('2d')

        for(var i=0; i<operation.length; i++) {
            var dx = Math.floor(i%6)*100
            var dy = Math.floor(i/6)*100
            ctx.save()
            ctx.fillStyle = '#33a9ff'
            ctx.fillRect(10+dx,10+dy,60,60)
            // TODO: does not work yet
            ctx.globalCompositeOperation = root.operation[i]
            ctx.fillStyle = '#ff33a9'
            ctx.globalAlpha = 0.75
            ctx.beginPath()
            ctx.arc(60+dx, 60+dy, 30, 0, 2*Math.PI)
            ctx.closePath()
            ctx.fill()
            ctx.restore()
        }
    }
7.7. Pixel Buffers
캔버스를 사용하여 작업 할 때 캔버스에서 픽셀 데이터를 검색하여 캔버스의 픽셀을 읽거나 조작 할 수 있습니다. 이미지 데이터를 읽으려면 createImageData (sw, sh) 또는 getImageData (sx, sy, sw, sh)를 사용하십시오. 두 함수 모두 너비, 높이 및 데이터 변수가있는 ImageData 객체를 반환합니다. 데이터 변수는 RGBA 형식으로 검색된 픽셀 데이터의 1 차원 배열을 포함하며 각 값은 0에서 255까지 다양합니다. 캔버스에서 픽셀을 설정하려면 putImageData (imagedata, dx, dy) 기능.
캔버스의 내용을 검색하는 또 다른 방법은 데이터를 이미지에 저장하는 것입니다. 이는 Canvas 함수 save (path) 또는 toDataURL (mimeType)을 통해 수행 할 수 있습니다. 여기서 later 함수는 Image URL로로드 할 수있는 이미지 URL을 반환합니다.
import QtQuick 2.0

Rectangle {
    width: 240; height: 120
    Canvas {
        id: canvas
        x: 10; y: 10
        width: 100; height: 100
        property real hue: 0.0
        onPaint: {
            var ctx = getContext("2d")
            var x = 10 + Math.random(80)*80
            var y = 10 + Math.random(80)*80
            hue += Math.random()*0.1
            if(hue > 1.0) { hue -= 1 }
            ctx.globalAlpha = 0.7
            ctx.fillStyle = Qt.hsla(hue, 0.5, 0.5, 1.0)
            ctx.beginPath()
            ctx.moveTo(x+5,y)
            ctx.arc(x,y, x/10, 0, 360)
            ctx.closePath()
            ctx.fill()
        }
        MouseArea {
            anchors.fill: parent
            onClicked: {
                var url = canvas.toDataURL('image/png')
                print('image url=', url)
                image.source = url
            }
        }
    }

    Image {
        id: image
        x: 130; y: 10
        width: 100; height: 100
    }

    Timer {
        interval: 1000
        running: true
        triggeredOnStart: true
        repeat: true
        onTriggered: canvas.requestPaint()
    }
}
작은 예제에서 우리는 왼쪽 캔버스에 작은 원을 매초 칠합니다. 사용이 마우스 영역에서 클릭되면 캔버스 내용이 저장되고 이미지 URL이 검색됩니다. 예제의 오른쪽에 이미지가 표시됩니다.
Note
Retrieving image data seems not to work currently in the Qt5 Alpha SDK.
7.8. Canvas Paint
이 예제에서는 Canvas 요소를 사용하여 작은 페인트 응용 프로그램을 만들고 싶습니다.
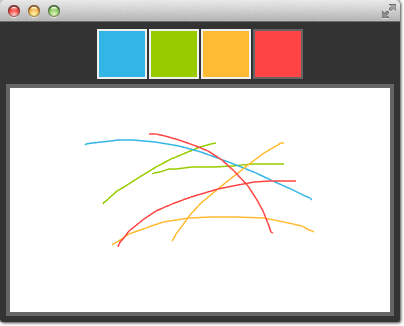
이를 위해 우리는 행 포지셔너를 사용하여 장면의 상단에 4 개의 색 사각형을 정렬합니다. 색 사각형은 클릭을 감지하기위한 마우스 영역이 채워진 간단한 사각형입니다.
    Row {
        id: colorTools
        anchors {
            horizontalCenter: parent.horizontalCenter
            top: parent.top
            topMargin: 8
        }
        property variant activeSquare: red
        property color paintColor: "#33B5E5"
        spacing: 4
        Repeater {
            model: ["#33B5E5", "#99CC00", "#FFBB33", "#FF4444"]
            ColorSquare {
                id: red
                color: modelData
                active: parent.paintColor == color
                onClicked: {
                    parent.paintColor = color
                }
            }
        }
    }
색상은 배열과 페인트 색상으로 저장됩니다. 사용자가 정사각형 중 하나를 클릭하면 정사각형의 색이 colorTools 행의 paintColor 속성에 지정됩니다.
캔버스에서 마우스 이벤트의 추적을 가능하게하기 위해 우리는 Canvas 요소를 덮는 MouseArea를 가지며 눌려진 위치와 변경된 핸들러를 연결했습니다.
    Canvas {
        id: canvas
        anchors {
            left: parent.left
            right: parent.right
            top: colorTools.bottom
            bottom: parent.bottom
            margins: 8
        }
        property real lastX
        property real lastY
        property color color: colorTools.paintColor

        onPaint: {
            var ctx = getContext('2d')
            ctx.lineWidth = 1.5
            ctx.strokeStyle = canvas.color
            ctx.beginPath()
            ctx.moveTo(lastX, lastY)
            lastX = area.mouseX
            lastY = area.mouseY
            ctx.lineTo(lastX, lastY)
            ctx.stroke()
        }
        MouseArea {
            id: area
            anchors.fill: parent
            onPressed: {
                canvas.lastX = mouseX
                canvas.lastY = mouseY
            }
            onPositionChanged: {
                canvas.requestPaint()
            }
        }
    }
마우스를 누르면 초기 마우스 위치가 lastX 및 lastY 속성에 저장됩니다. 마우스 위치가 변경 될 때마다 캔버스에서 페인트 요청이 트리거되므로 onPaint 핸들러가 호출됩니다.
마지막으로 사용자 스트로크를 그리려면 onPaint 핸들러에서 새 경로를 시작하고 마지막 위치로 이동합니다. 그런 다음 마우스 영역에서 새 위치를 모으고 선택한 색상의 선을 새 위치로 그립니다. 마우스 위치는 새로운 마지막 위치로 저장됩니다.
7.9. Porting from HTML5 Canvas
- https://developer.mozilla.org/en/Canvas_tutorial/Transformations
- http://en.wikipedia.org/wiki/Spirograph
QML 캔버스를 사용하기 위해 HTML5 캔버스 그래픽을 이식하는 것은 상당히 쉽습니다. 수천 가지 예제에서 우리는 하나를 골라 내었습니다.
Spiro Graph
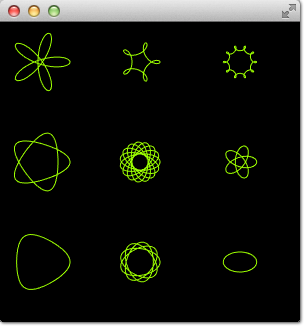
모질라 프로젝트의 spiro graph 예제를 기초로 사용합니다. 원래 HTML5는 canvas tutorial의 일부로 게시되었습니다.
몇 줄을 변경해야하는 곳 :
Qt Quick에서는 변수 선언을 요구하므로 일부 var 선언을 추가해야했습니다.
for (var i=0;i<3;i++) {
    ...
}
draw 메소드를 Context2D 객체를 받아들이도록 (듯이) 변경했습니다.
function draw(ctx) {
    ...
}
우리는 크기가 다르기 때문에 각 스피로의 번역을 조정해야했습니다.
ctx.translate(20+j*50,20+i*50);
마지막으로 onPaint 핸들러를 완성했습니다. 내부에서 컨텍스트를 얻고 드로잉 기능을 호출합니다.
    onPaint: {
        var ctx = getContext("2d");
        draw(ctx);
    }
결과는 QML 캔버스를 사용하여 실행되는 이동 된 스피로 그래프 그래픽입니다.
That’s all.
Glowing Lines
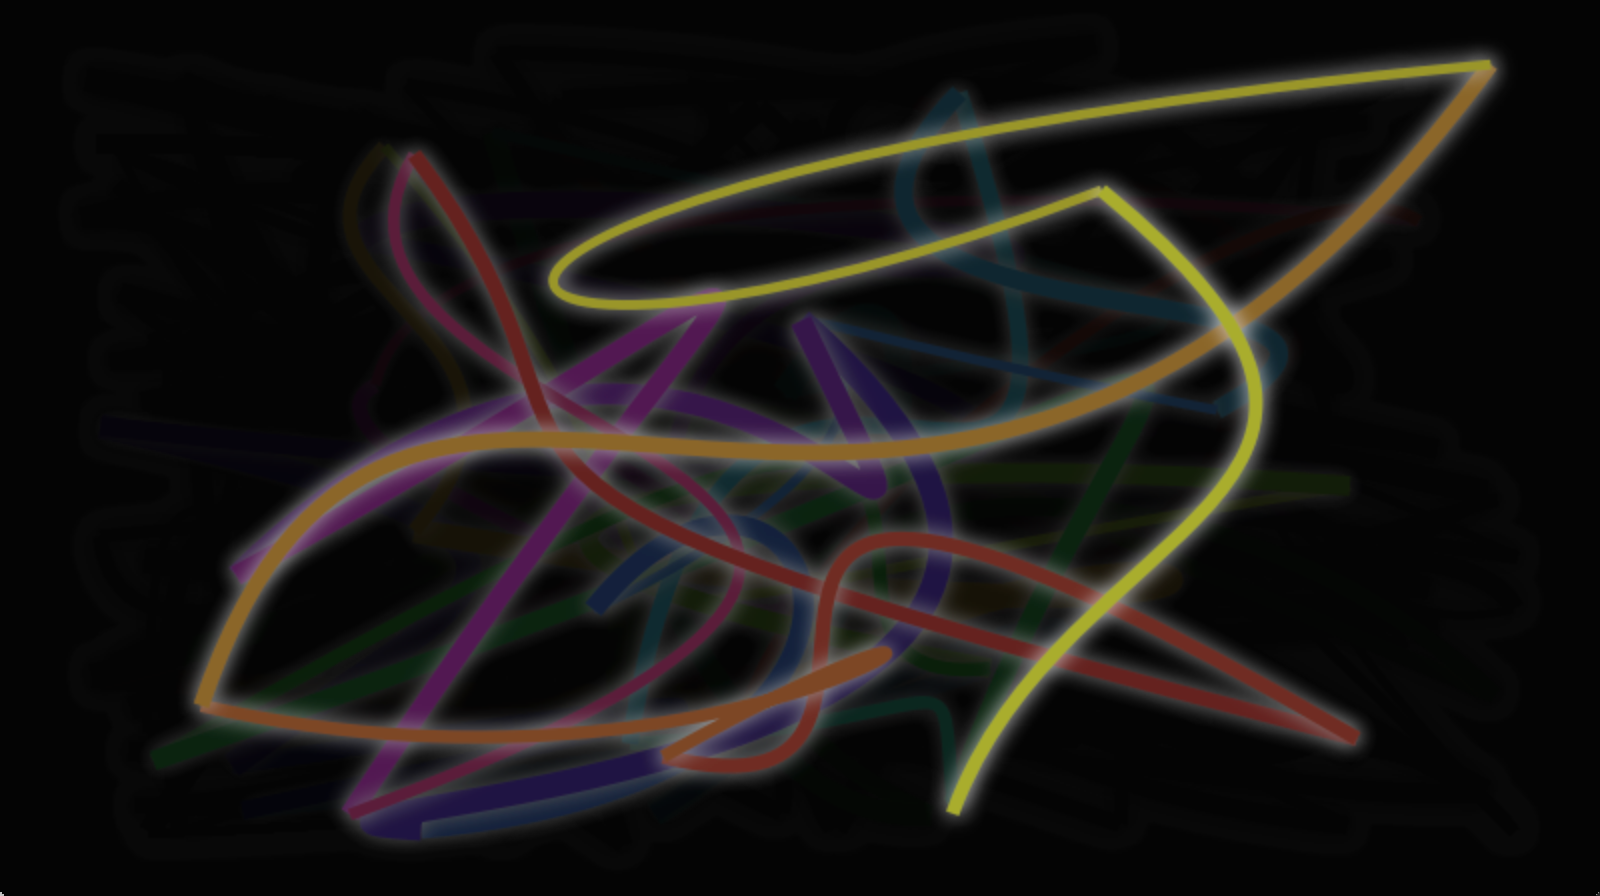
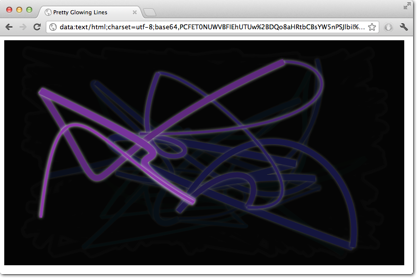
여기 W3C 조직의 또 다른 복잡한 포트가 있습니다. pretty glowing lines은 꽤 멋진 측면을 가지고있어서 이식이 더욱 어려워집니다.
<!DOCTYPE HTML>
<html lang="en">
<head>
    <title>Pretty Glowing Lines</title>
</head>
<body>

<canvas width="800" height="450"></canvas>
<script>
var context = document.getElementsByTagName('canvas')[0].getContext('2d');

// initial start position
var lastX = context.canvas.width * Math.random();
var lastY = context.canvas.height * Math.random();
var hue = 0;

// closure function to draw
// a random bezier curve with random color with a glow effect
function line() {

    context.save();

    // scale with factor 0.9 around the center of canvas
    context.translate(context.canvas.width/2, context.canvas.height/2);
    context.scale(0.9, 0.9);
    context.translate(-context.canvas.width/2, -context.canvas.height/2);

    context.beginPath();
    context.lineWidth = 5 + Math.random() * 10;

    // our start position
    context.moveTo(lastX, lastY);

    // our new end position
    lastX = context.canvas.width * Math.random();
    lastY = context.canvas.height * Math.random();

    // random bezier curve, which ends on lastX, lastY
    context.bezierCurveTo(context.canvas.width * Math.random(),
    context.canvas.height * Math.random(),
    context.canvas.width * Math.random(),
    context.canvas.height * Math.random(),
    lastX, lastY);

    // glow effect
    hue = hue + 10 * Math.random();
    context.strokeStyle = 'hsl(' + hue + ', 50%, 50%)';
    context.shadowColor = 'white';
    context.shadowBlur = 10;
    // stroke the curve
    context.stroke();
    context.restore();
}

// call line function every 50msecs
setInterval(line, 50);

function blank() {
    // makes the background 10% darker on each call
    context.fillStyle = 'rgba(0,0,0,0.1)';
    context.fillRect(0, 0, context.canvas.width, context.canvas.height);
}

// call blank function every 50msecs
setInterval(blank, 40);

</script>
</body>
</html>
HTML5에서 Context2D 객체는 언제든지 캔버스에 칠할 수 있습니다. QML에서는 onPaint 핸들러 내부를 가리킬 수 있습니다. setInterval 을 사용하여 타이머를 사용하면 HTML5에서 줄의 선이나 화면이 비어있게됩니다. QML의 처리 방식이 다르기 때문에 이러한 함수를 호출 할 수는 없습니다. onPaint 핸들러를 사용해야하기 때문입니다. 또한 컬러 프레젠테이션을 적용해야합니다. 하나씩 변경 사항을 살펴 보겠습니다.
모든 것은 캔버스 요소로 시작됩니다. 간단히하기 위해 Canvas 요소를 QML 파일의 루트 요소로 사용합니다.
import QtQuick 2.0

Canvas {
   id: canvas
   width: 800; height: 450

   ...
} setInterval을 통해 함수의 직접 호출을 분리하기 위해 setInterval호출을 다시 칠하기를 요청할 두 개의 타이머로 대체합니다. Timer는 짧은 간격 후에 트리거되어 일부 코드를 실행할 수 있습니다. paint 함수에게 어떤 연산을 알릴 수 없으므로 우리는 각 연산에 대해 정의한 트리거를 정의 할 수 있습니다. bool 플래그는 연산을 요청하고 다시 칠하기 요청을 트리거합니다.
다음은 라인 작업을위한 코드입니다. 공백 작업도 비슷합니다.
...
property bool requestLine: false

Timer {
    id: lineTimer
    interval: 40
    repeat: true
    triggeredOnStart: true
    onTriggered: {
        canvas.requestLine = true
        canvas.requestPaint()
    }
}

Component.onCompleted: {
    lineTimer.start()
}
...
이제 onPaint 작업 중 수행해야하는 작업 (줄 또는 공백 또는 두 작업 모두)이 있습니다. 페인트 요청마다 onPaint 핸들러를 입력 할 때 canvas 요소에 변수의 초기화를 추출해야합니다.
Canvas {
    ...
    property real hue: 0
    property real lastX: width * Math.random();
    property real lastY: height * Math.random();
    ...
}
이제 우리의 페인트 함수는 다음과 같이 보일 것입니다 :
onPaint: {
    var context = getContext('2d')
    if(requestLine) {
        line(context)
        requestLine = false
    }
    if(requestBlank) {
        blank(context)
        requestBlank = false
    }
}
line 이제 우리의 페인트 함수는 다음과 같이 보일 것입니다 :
function line(context) {
    context.save();
    context.translate(canvas.width/2, canvas.height/2);
    context.scale(0.9, 0.9);
    context.translate(-canvas.width/2, -canvas.height/2);
    context.beginPath();
    context.lineWidth = 5 + Math.random() * 10;
    context.moveTo(lastX, lastY);
    lastX = canvas.width * Math.random();
    lastY = canvas.height * Math.random();
    context.bezierCurveTo(canvas.width * Math.random(),
        canvas.height * Math.random(),
        canvas.width * Math.random(),
        canvas.height * Math.random(),
        lastX, lastY);

    hue += Math.random()*0.1
    if(hue > 1.0) {
        hue -= 1
    }
    context.strokeStyle = Qt.hsla(hue, 0.5, 0.5, 1.0);
    // context.shadowColor = 'white';
    // context.shadowBlur = 10;
    context.stroke();
    context.restore();
}
가장 큰 변화는 QML의 사용 된 0.0 ~ 1.0 범위에 값을 적용해야하는 Qt.rgba() () 및 Qt.hsla() 함수의 사용이었습니다.
빈 함수에도 동일하게 적용됩니다.
function blank(context) {
    context.fillStyle = Qt.rgba(0,0,0,0.1)
    context.fillRect(0, 0, canvas.width, canvas.height);
}
현재 그림자가없는 최종 결과는 이와 비슷하게 보입니다.

Todo
There are currently heavy issues with the shadow implementation. This currently does not work
Note
Adobe Illustrator
Adobe Illustrator has a plug-in to export the artwork as HTML5 canvas code.
'Qt' 카테고리의 다른 글
| Exposing Attributes of C++ Types to QML (0) | 2017.06.10 |
|---|---|
| Intergrating QML and C++ (0) | 2017.06.10 |
| [발번역] Performance Considerations And Suggestions (0) | 2017.05.15 |
| QtCreator 실행 시 libHelp.so 파일 없음 경고 해결 (0) | 2016.07.25 |
| [발번역] Data Type Conversion Between QML and C++ (0) | 2016.01.22 |

